Yii2 - Adding RBAC to a site, role-based access control

Hello colleagues.
In today's article, we will talk about how to set up RBAC in yii2. If anyone does not know, then RBAC is one of the components in yii2 that is responsible for role-based access control. For example, you have some kind of action and you need to check whether the current user has the right to perform this action or not. The depth of inheritance in RBAC has practically no limits, you can create as many roles as you like and then assign them to users.
RBAC is disabled by default in yii2. So let's set it up.
The first thing you need to know about RBAC is that its rules can be stored either in a regular file or in a database.
- yii\rbac\PhpManager - Storing rules in files.
- yii\rbac\DbManager - Storing rules in a database.
In this article, I will show the work of yii\rbac\DbManager, since in my opinion it is more practical than yii\rbac\PhpManager.
The first step in setting up RBAC is to enable it in the web.php and console.php configuration files.
'authManager' => [
    'class' => 'yii\rbac\DbManager',
    'cache' => 'cache'
]
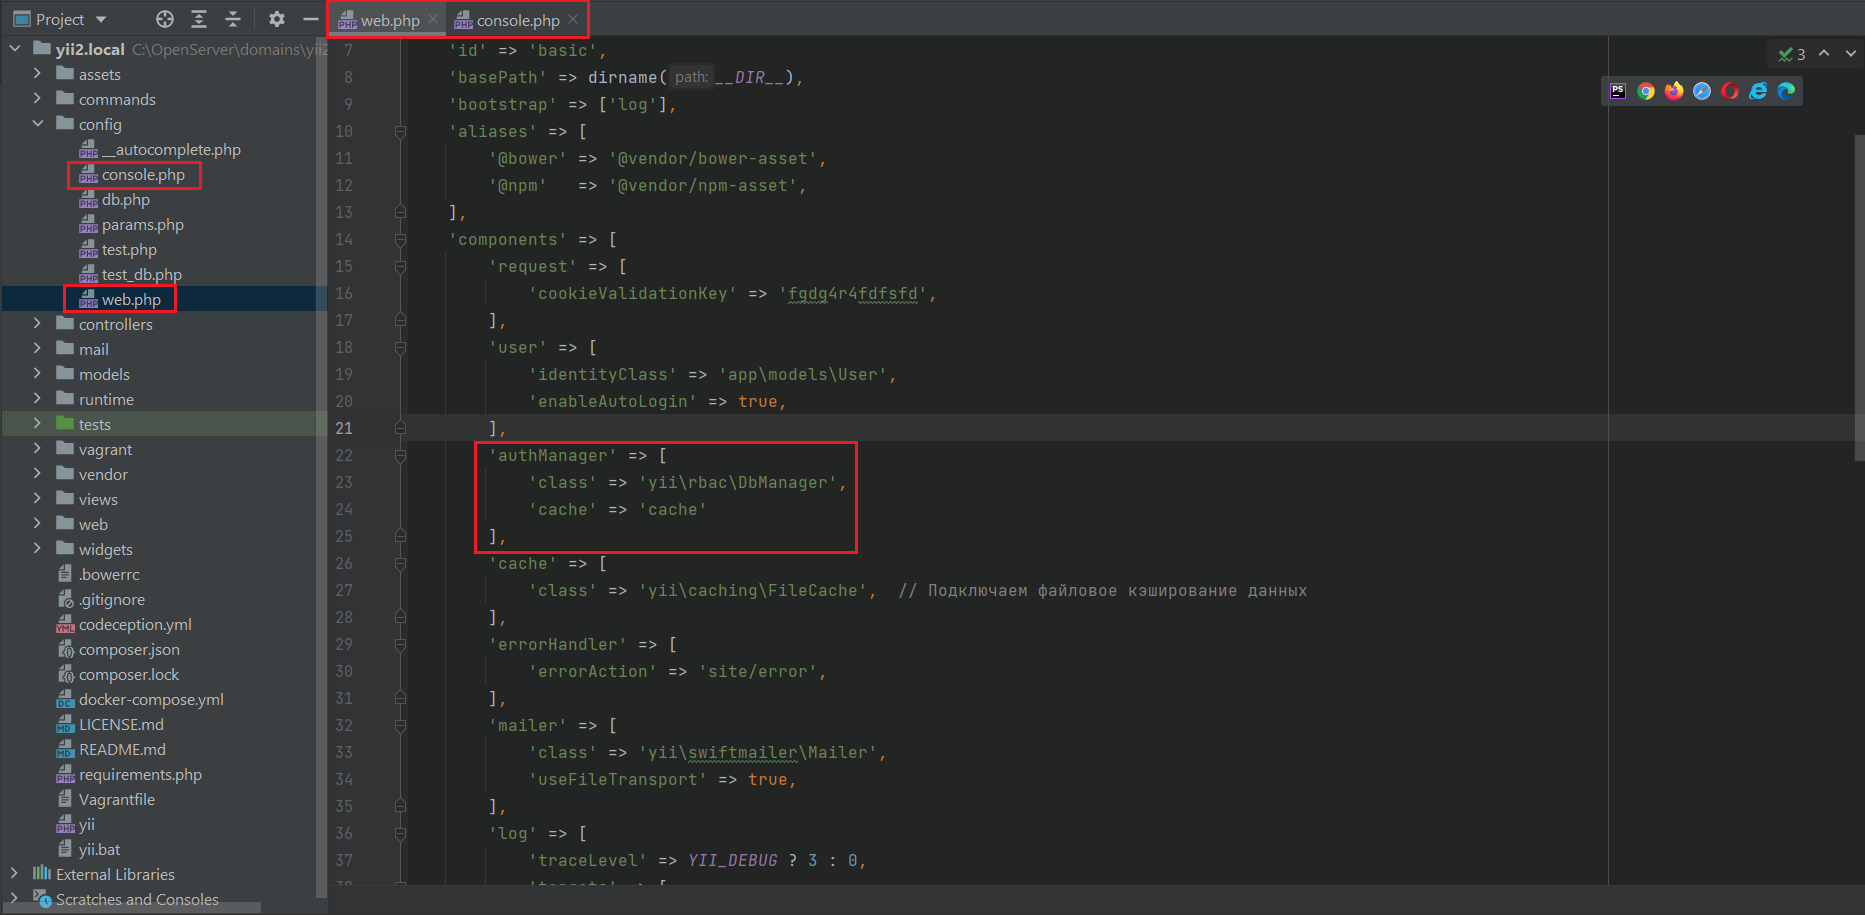
In addition to RBAC itself, we also enable caching with the 'cache' => 'cache' property to reduce the load on the database.
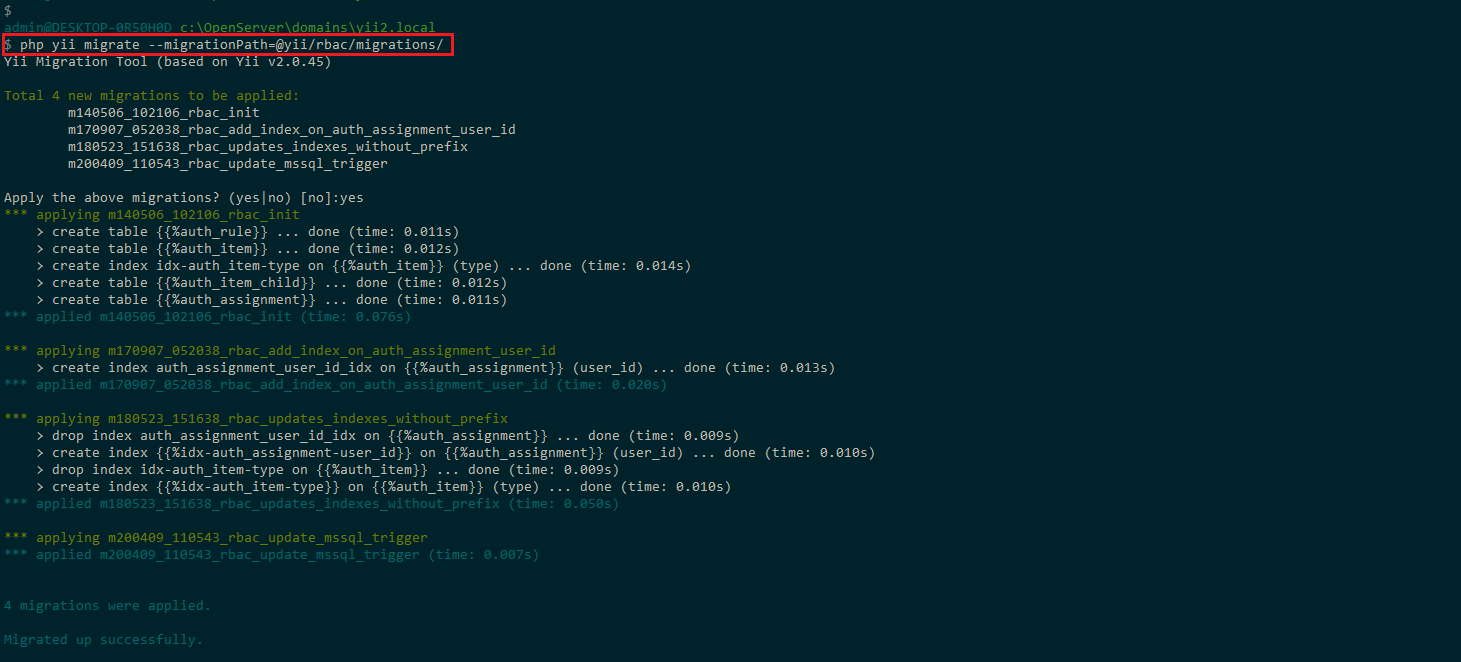
The next step is to prepare the database for rbac. rbac will use 4 tables in its robot, and we will need to create them.
- auth_item: the table contains role/permitssion and their description.
- auth_item_child: keeps role/permitssion inheritances from each other.
- auth_assignment: here is the data about assigning role/permission to users.
- auth_rule: storage of individual rules.

We can create these tables in two ways.
The first way is to run the migration command in the console which will create the tables automatically:
php yii migrate --migrationPath=@yii/rbac/migrations/
The second way is to create these tables manually:
CREATE TABLE `auth_assignment` (
  `item_name` varchar(64) COLLATE utf8_unicode_ci NOT NULL,
  `user_id` varchar(64) COLLATE utf8_unicode_ci NOT NULL,
  `created_at` int(11) DEFAULT NULL,
  PRIMARY KEY (`item_name`,`user_id`),
  KEY `idx-auth_assignment-user_id` (`user_id`),
  CONSTRAINT `auth_assignment_ibfk_1` FOREIGN KEY (`item_name`)
  REFERENCES `auth_item` (`name`) ON DELETE CASCADE ON UPDATE CASCADE
) ENGINE=InnoDB DEFAULT CHARSET=utf8 COLLATE=utf8_unicode_ci;
CREATE TABLE `auth_item` (
  `name` varchar(64) COLLATE utf8_unicode_ci NOT NULL,
  `type` smallint(6) NOT NULL,
  `description` text COLLATE utf8_unicode_ci DEFAULT NULL,
  `rule_name` varchar(64) COLLATE utf8_unicode_ci DEFAULT NULL,
  `data` blob DEFAULT NULL,
  `created_at` int(11) DEFAULT NULL,
  `updated_at` int(11) DEFAULT NULL,
  PRIMARY KEY (`name`),
  KEY `rule_name` (`rule_name`),
  KEY `idx-auth_item-type` (`type`),
  CONSTRAINT `auth_item_ibfk_1` FOREIGN KEY (`rule_name`)
  REFERENCES `auth_rule` (`name`) ON DELETE SET NULL ON UPDATE CASCADE
) ENGINE=InnoDB DEFAULT CHARSET=utf8 COLLATE=utf8_unicode_ci;
CREATE TABLE `auth_item_child` (
  `parent` varchar(64) COLLATE utf8_unicode_ci NOT NULL,
  `child` varchar(64) COLLATE utf8_unicode_ci NOT NULL,
  PRIMARY KEY (`parent`,`child`),
  KEY `child` (`child`),
  CONSTRAINT `auth_item_child_ibfk_1` FOREIGN KEY (`parent`)
  REFERENCES `auth_item` (`name`) ON DELETE CASCADE ON UPDATE CASCADE,
  CONSTRAINT `auth_item_child_ibfk_2` FOREIGN KEY (`child`)
  REFERENCES `auth_item` (`name`) ON DELETE CASCADE ON UPDATE CASCADE
) ENGINE=InnoDB DEFAULT CHARSET=utf8 COLLATE=utf8_unicode_ci;
CREATE TABLE `auth_rule` (
  `name` varchar(64) COLLATE utf8_unicode_ci NOT NULL,
  `data` blob DEFAULT NULL,
  `created_at` int(11) DEFAULT NULL,
  `updated_at` int(11) DEFAULT NULL,
  PRIMARY KEY (`name`)
) ENGINE=InnoDB DEFAULT CHARSET=utf8 COLLATE=utf8_unicode_ci;
Now that we've enabled rbac and created tables, let's create some roles.
Our first role will be called Admin.
$role = Yii::$app->authManager->createRole('admin');
$role->description = 'Admin';
Yii::$app->authManager->add($role);
We'll call the second role Manager.
$role = Yii::$app->authManager->createRole('author');
$role->description = 'Manager';
Yii::$app->authManager->add($role);
Now that we have created a couple of roles on our site, we can now use them in the AccessControl filter to configure access.
public function behaviors()
{
    return [
        'access' => [
            'class' => AccessControl::className(),
            'rules' => [
                [
                    'actions' => ['adminpanel'],
                    'allow' => true,
                    'roles' => ['admin'],
                ],
            ],
        ]
    ];
}
With this code, we specify that only those users who have the admin role can access the adminpanel action. But we do not yet have a user with such a role, but there is only a role.
Another feature of rbac is that we can create not only roles, but also rights. Rights are created in the same way as roles.
$permit = Yii::$app->authManager->createPermission('grantModerator');
$permit->description = 'Grant moderator';
Yii::$app->authManager->add($permit);
Yii2 itself will not check the user's permissions. The name "grantModerator" is just a regular string, it has nothing to do with action and other entities in Yii2. It is up to you to check whether the user has the right to perform actions.
if(Yii::$app->user->can('grantModerator'))
{
    //perform some action
}
else throw new ForbiddenHttpException('You do not have sufficient rights to perform the specified action');
In Yii2, roles and rights can be inherited, and there are no restrictions on what is inherited from what.
You can inherit:
- role from role
- role from right
- right from the role
- right from right
Now it's time to bind our role to some user, in my case I will bind the admin role to the administrator user. The binding is carried out by the user ID in the database and this is done once. rbac will store the data in the auth_assignment table and will pick up the role automatically when the user is authorized. Binding is best done when creating a new user.
$userRole = Yii::$app->authManager->getRole('admin');
Yii::$app->authManager->assign($userRole, Yii::$app->user->getId());
You can bind to a user not only roles, but also rights.
$permit = Yii::$app->authManager->getPermission('grantModerator');
Yii::$app->authManager->assign($permit, Yii::$app->user->getId());
The binding of the right is also carried out by the user ID in the database and this is done once.
A user can have multiple roles. To get all user roles you can do like this:
Yii::$app->authManager->getRolesByUser(Yii::$app->user->getId());
Thank you all, I hope my article was of some help to you.